It is a solution for the integrated management of a solar thermal system and a gas boiler for the production of domestic hot water. It allows you to optimally manage the flow of hot water produced by the solar thermal panels, to limit or exclude the intervention of the gas boiler in the summer time and use the gas boiler just to integrate the thermal panels when the solar radiation is not enough to guarantee the minimum temperature required for the consumption of sanitary water. It is composed by a sensor, positioned near the solar tank, which measures the water temperature and transmits it to a central unit located near the gas boiler. The central unit, depending on the exchange temperature configured by the user, decides whether to deviate the flow of hot water from the solar tank directly to the sanitary consumption or send it through the boiler to integrate the thermal energy and therefore the water temperature at the desired level. A three-way valve is used to deviate the flow of the water and works in two positions:
- Bypass position: when the temperature of the solar storage tank is higher than the exchange temperature, the flow of hot water from the solar tank “bypasses” the boiler which remains inactive for the production of sanitary water
- Integration position: when the temperature of the solar storage tank is lower than the exchange temperature, the flow of water (preheated) coming from the solar tank is passed through the boiler which raises the water temperature to the desired level.
The sensor is powered by a solar cell and a backup battery and transmits data to the central unit via radio at the frequency of 433Mhz.
The central unit controls the exchange valve and decides the direction of the hot water flow comparing the temperature of the water in the solar tank received by the sensor and the exchange temperature configured by the user.
In addition, the central unit collects external environmental information such as temperature and humidity and checks the filling status of the tank used to collect the condensate produced by the gas boiler (in case of condensing boilers without free drain).
The central unit can be connected to the home WiFi network to transmit the system operating information to the Internet for remote monitoring purposes.
Sensor
Here follows the block diagram of the sensor:
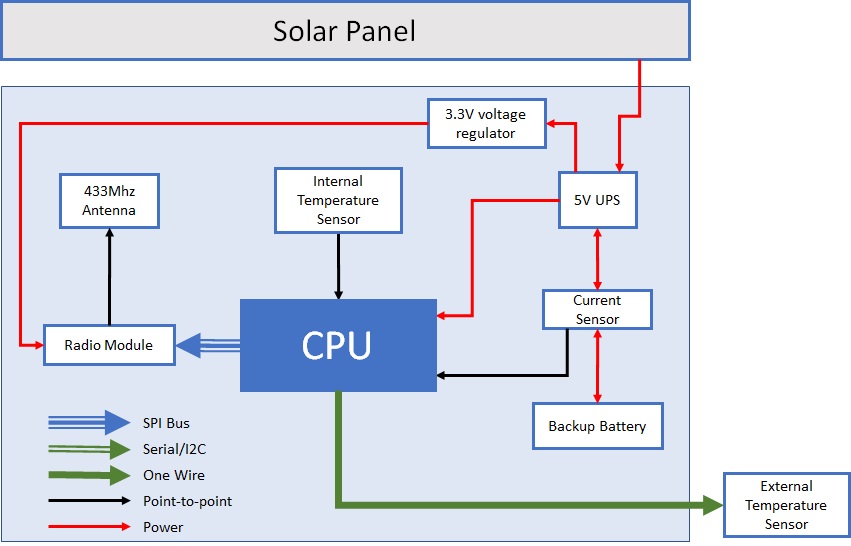
Diagram includes:
- Central Processing Unit (CPU)
- 433Mhz radio communication module with antenna
- External temperature sensor (to measure the water temperature in the tank)
- Internal temperature sensor
- Battery current and voltage sensor
- Backup battery
- 5v regulated output UPS module
- 3.3v voltage regulator
The sensor is hosted inside a waterproof box with a transparent cover. A photo voltaic module is placed just below the cover and generates the electricity required by the electronic board. A UPS module and a backup battery complete the power supply section to ensure that the sensor can continue to transmit data for several days even in the absence of sufficient solar radiation.
The temperature of the water in the solar tank is measured by a probe based on the Dallas DS18B20 sensor.
The temperature data as well as other internal operating parameters of the sensor (battery level, charge / discharge current, internal temperature of the box), are transmitted to the central unit using the radio module with a transmission frequency of 433Mhz.
The following figure shows the sensor electronic board.
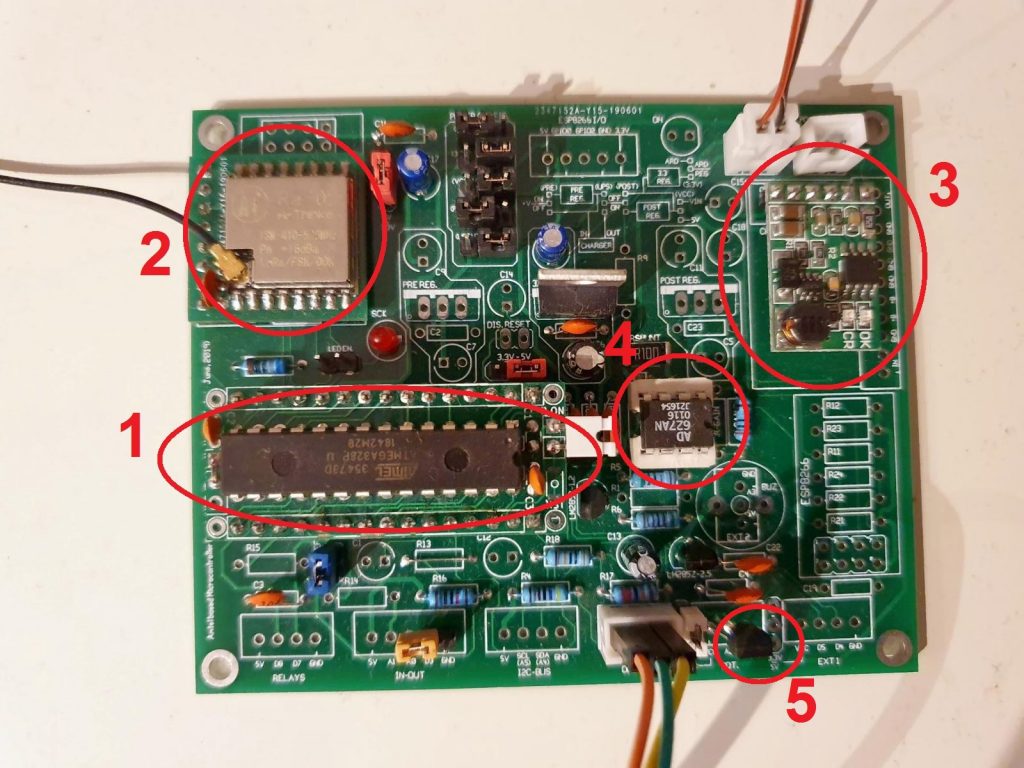
The component (1) is the heart of the board and is based on the Atmel ATmega328p microcontroller produced by Microchip Technology (ref. [1]). The component (2) is the LoRa Ra-02 data transmission module produced by AI-Thinker and based on the SX1278 chip (ref. [2]) working at the frequency of 433MHz. The component (3) is the UPS module connected to the photo voltaic module and to the backup battery, providing the 5V regulated power source required by the electronic board.
The board is also equipped with two optional components: the first (4) is an instrumental amplifier used to measure the current flowing to and from the backup battery. Current intensity and direction are used to to determine the State of Charge (SoC) of the backup battery. The intensity of the battery charge current is also a good indicator of the intensity of solar radiation and can be used for environmental monitoring. The second optional component is a temperature sensor, based on the MCP9700 active thermistor produced by Microchip Technology (ref. [4]) that can measure temperature in a wide range going from -40 to 125 ° C with good accuracy in the typical operating range of this device (-10 to 50 ° C). This sensor is used to measure the internal temperature of the box hosting the electronic components to check the operating limits and adjust the sensor operating parameters according to the temperature.
The following figure shows the housing of the electronic components inside the box.
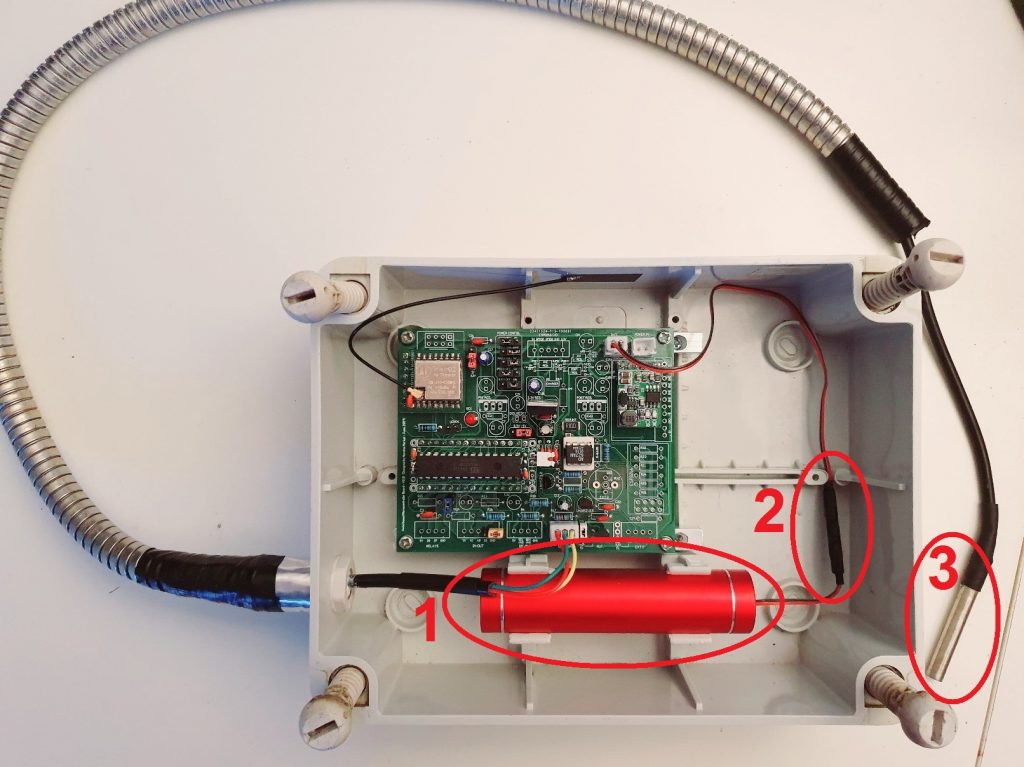
In the electrical box, in addition to the sensor control board described above, there is the backup battery (1). This is placed inside a cylindrical aluminum container anchored to the electrical box by PVC clips and is connected to the control board through a protection circuit to prevent excessive charge / discharge of the battery (2). The temperature sensor (3) is inserted inside a waterproof capsule and connected to the control board by an electric cable. The cable outside the box is protected by a steel coating tube. Here, a simple shower hose was used to protect the integrity of the cable from the external agents (rain, ice, snow, UV radiation, …).
The battery is kept on charge by a photo-voltaic panel placed below the transparent lid of the box (figure 3).
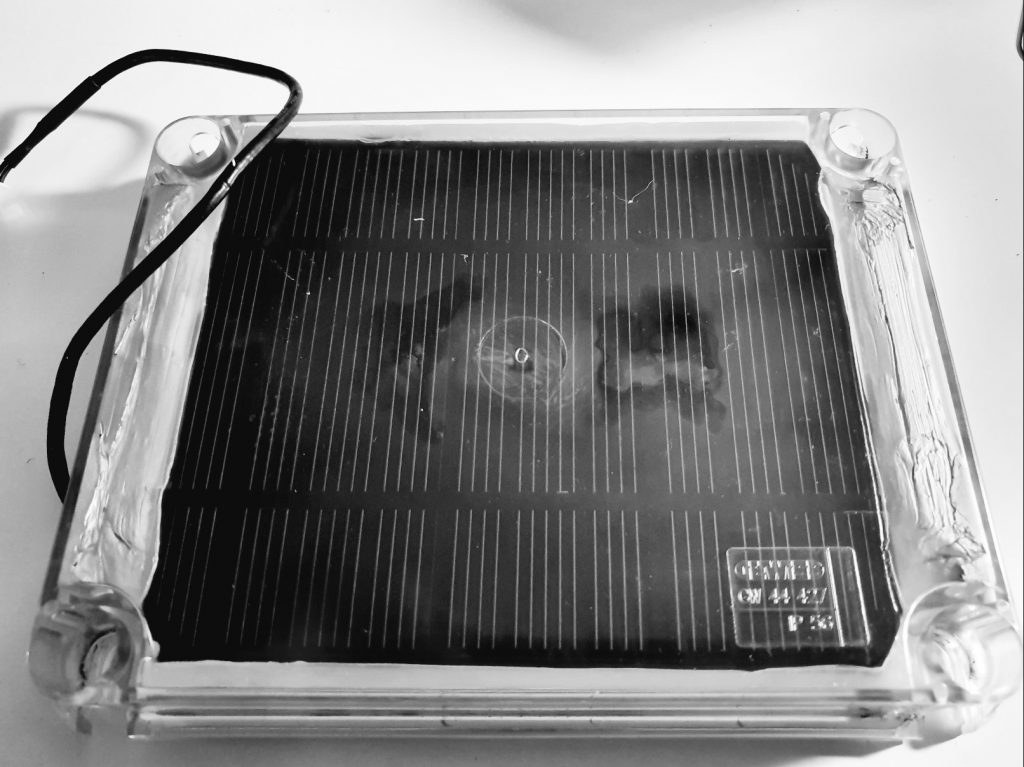
Inside the box, under the photo-voltaic panel, an MDF panel suitably shaped and sealed with silicone at the edges, creates a sort of interspace between the photo-voltaic panel and the lower part of the box hosting the electronics (figure 4).
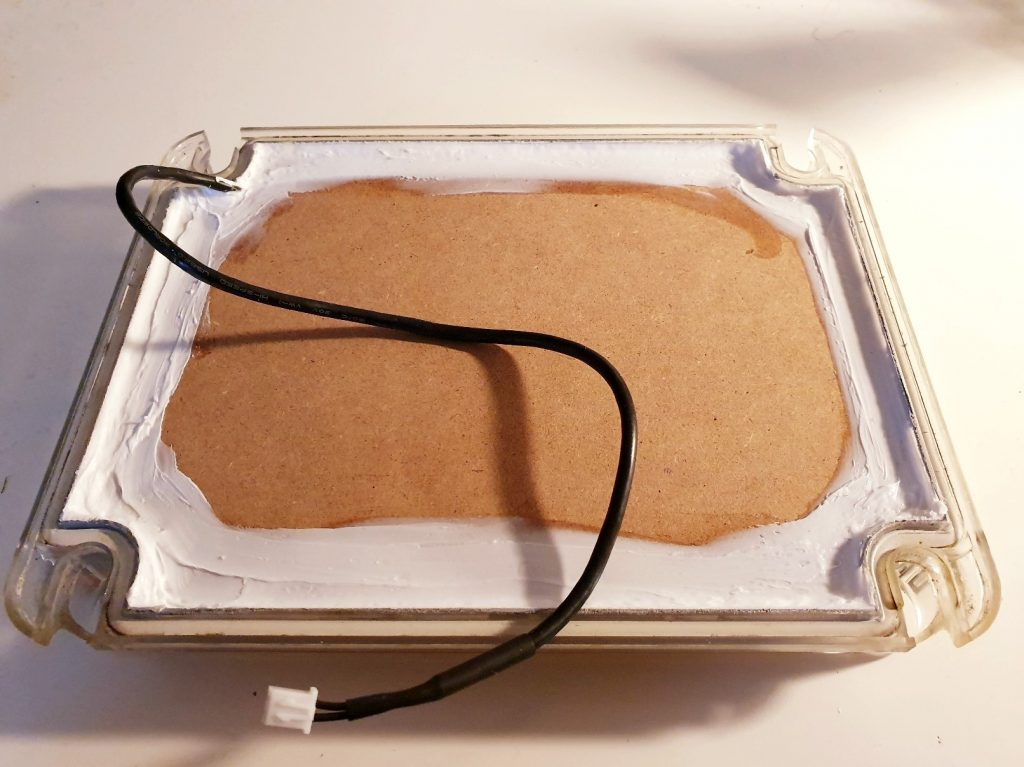
Not visible in the figure, the interspace has been filled with foam to obtain a thermal insulation between the lid and the lower part of the box to limit the temperature rise in summer time when the solar radiation is very intense.
In the final assembly, the sensor box is positioned on the roof next to the hot water tank. The capsule with the temperature sensor is inserted in a cockpit placed on one side of the tank (generally hot water tanks are equipped with a cockpit for analog temperature probes – in this case the analog probe can be removed and replaced with the digital probe).
Central unit
The central unit is the heart of the solution. Here follows the block diagram:
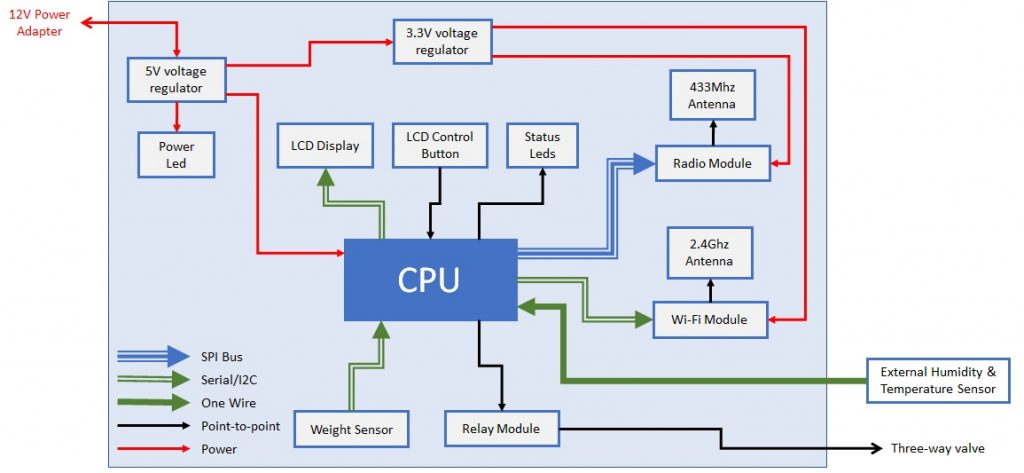
The diagram includes:
- Central processing unit (CPU)
- 433Mhz radio transmission module and antenna
- 2.4GHz WiFi connection module and antenna
- 16×2 characters LCD Display module
- Relay module used to control the flow switch valve
- External humidity and temperatyre sensor
- Weight sensoe
- Multifunctional push button
- Status/Power leds
- 5v and 3.3v voltage regulators
- 12v exernal power supply
The following figure shows the front panel of the control unit:
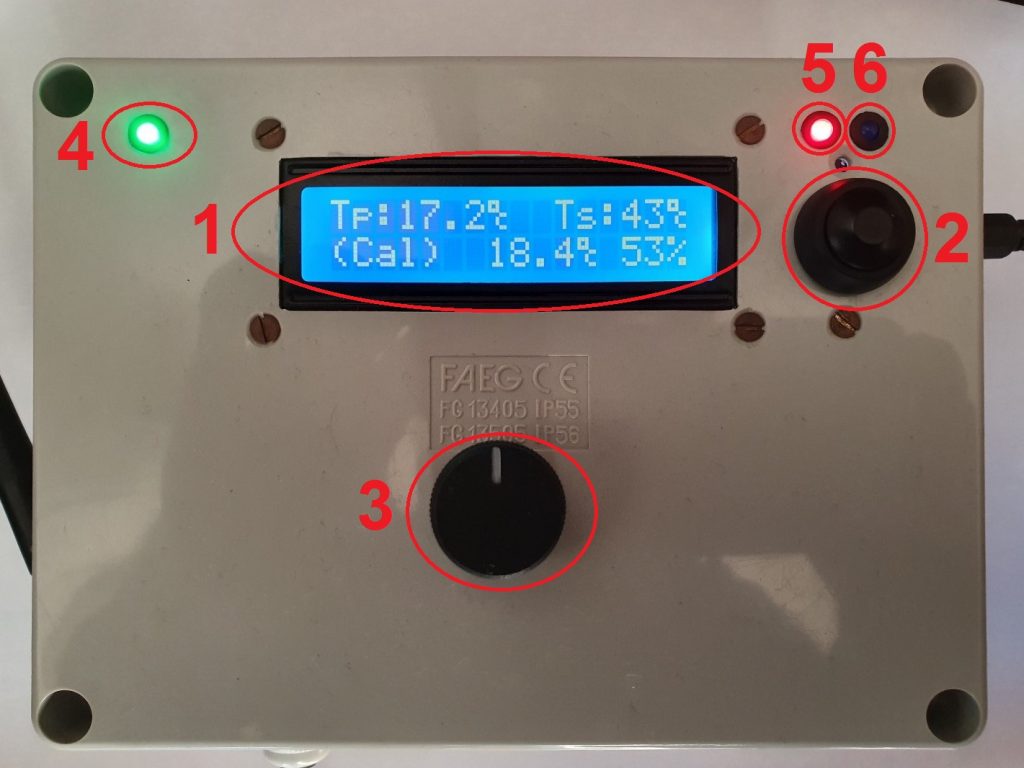
The electronic components are hosted inside a PVC electrical box. The front panel embeds the LCD display (1) for viewing working parameters and the operating status, the multifunctional button (2) is used to browse the different views of the display and operate the basic commands to configure and adjust the unit operating parameters, the knob used to regulate the exchange temperature (3), the indicator LEDs that allow you to quickly check the health status of the device: these are from left to right the power on indicator (4), the health of the radio link with the sensor (5), the status of the connection to the WiFi network (6). The following figures show the external sides of the unit.

On the left hand side there is the WiFi antenna (1), on the lower side there are the connection cable to the sensor for the ambient temperature and humidity (2) and the the auxiliary connector (3). This is used in this project by the weight sensor to measure the level of the condensate in the tank which is produced by the gas boiler. On the right hand side there are the 12V / 1A power supply connector (4) and the connector needed to drive the flow switch valve (5).
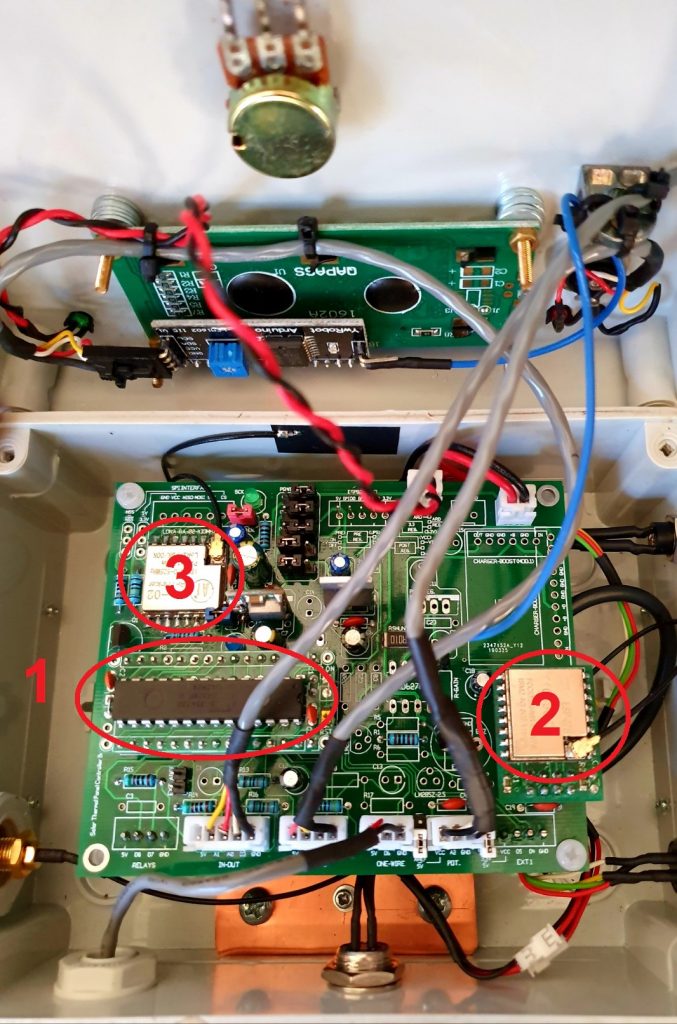
The main electronic board is placed inside the box (Figure 7) and includes the following components: (1) it is the CPU that is based on the Atmel ATmega328p microcontroller (ref. [1]), (2) it is the WiFi module for the connection to the internet that is based on the ESP8266 chip, (3) is the LoRa Ra-02 data transmission module (ref. [2]). The WiFi module model is the well-known ESP-07S produced by Ai-Thinker (ref. [3]) which is equipped with an external connector for the external WiFi antenna.
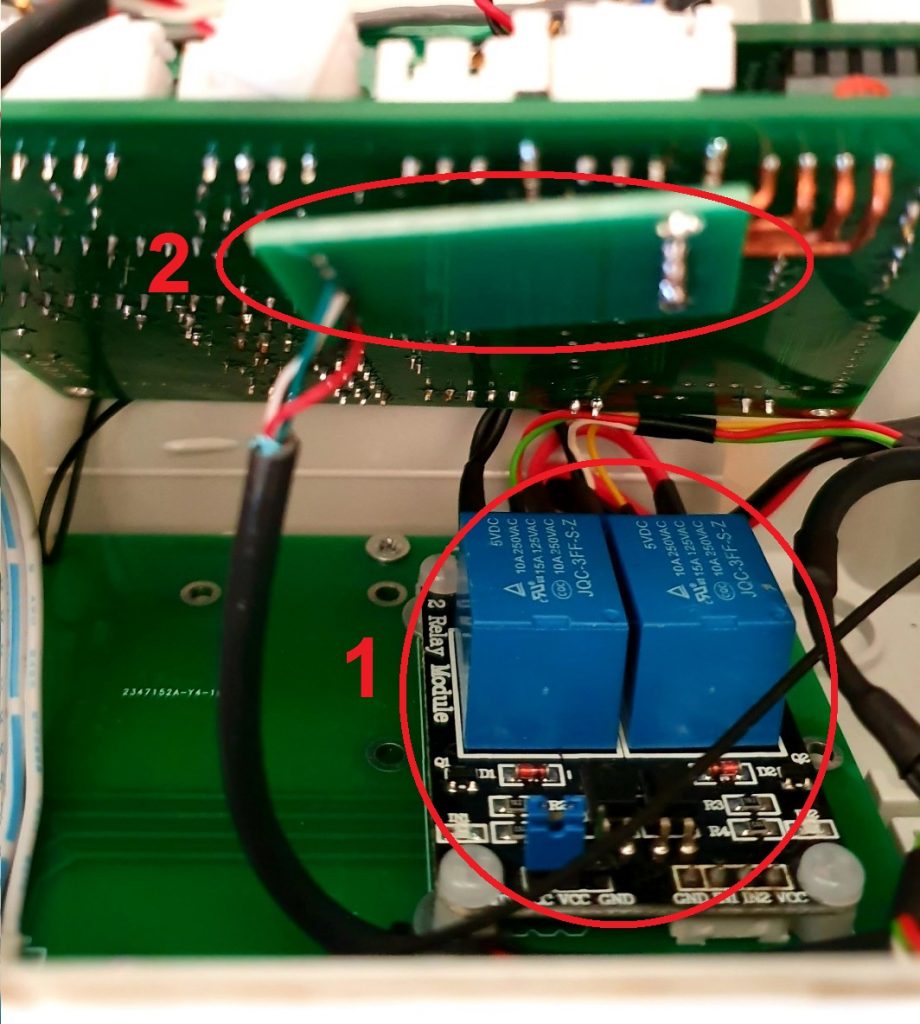
Under the main electronic board there is an auxiliary board (Figure 58) which hosts a pair of relays (1) required to drive the three-way flow exchange valve. In addition, the image reveals the HX711 module (2) located on the rear face of the main board. This module represents the interface with the sensor that measures the weight and therefore the level of condensate in the tank placed under the boiler.
The tank for collecting the condensate rests on a weight scale made of two parallel plates interconnected by a torsion element (load cell) which represents the weight sensor (see ref. [5] for further details).
IoT and Monitoring
As mentioned above, the central unit has an ESP8266 module used to connect to home WiFi network. In this solution, the internet connection is used to send overall status information to an API service which saves it into a database. A web interface is then used to monitor the status of the controller from any device and location over the internet. Following picture shows the simple architecture of the API and monitoring service:
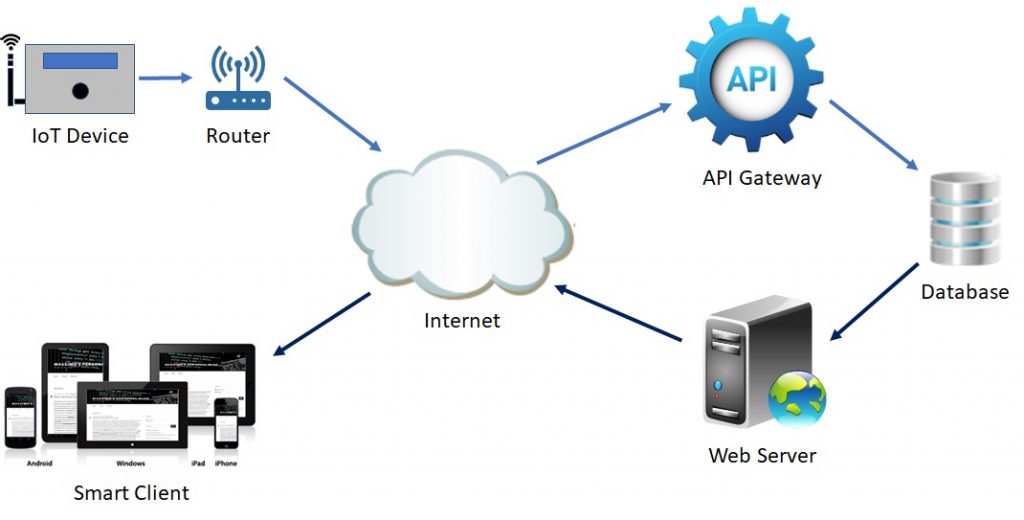
The API gateway exposes an API called directly from the central unit (IoT device) and stores status data to a MySQL database. The web server exposes a web page (php) that shows the latest status information using the graphical representation shown below:
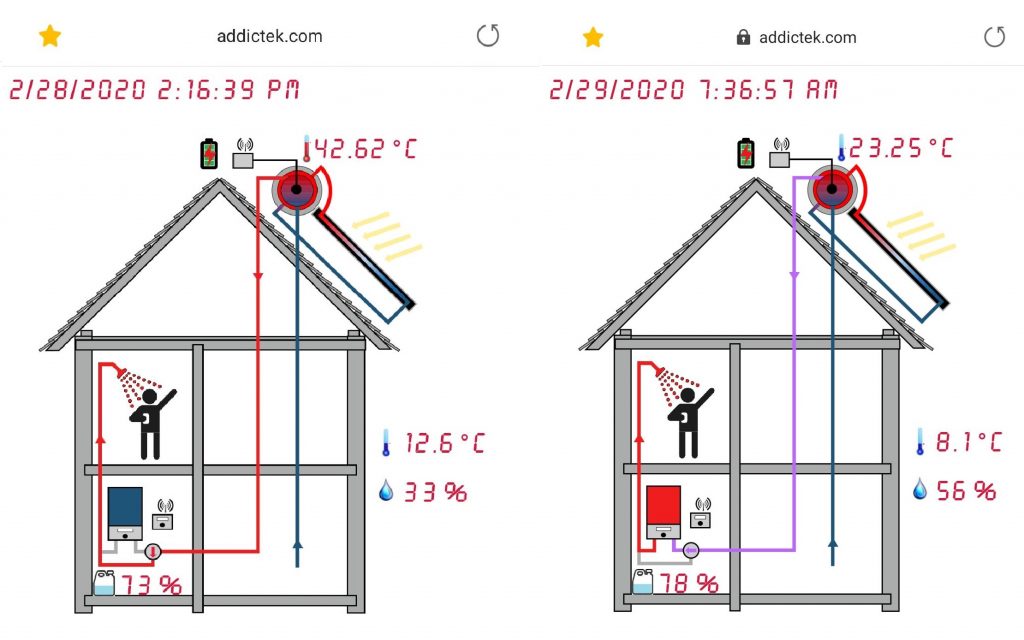
Status information shown in the picture includes:
- Flow status
- Solar tank water temperature
- Sensor battery charging level and status
- External temperature and humidity
- Filling status of the tank for condensate placed below the gas boiler
In addition, the page can show various health monitoring alerts like:
- The communication health status between the central unit and the sensor
- The condensate tank level above 90%
References
[1] Atmel ATmega328p microcontroller – Microchip Technology
[2] Ai-Thinker LoRa Ra-02 radio transmission module
[3] Ai-Thinker ESP07-S WiFi Module
[4] MCP9700 linear thermistor for temperature measurement
[5] Article: Building an electronic weight scale using a load cell sensor
